At one point or another, virtually every homebrewer will find themself questioning the pros and cons of how they package their beer. Which is better, bottling or kegging?
When preparing your homebrew for storage, bottling and kegging are both reasonably accessible options. Bottling is easy to learn, and a good way to store beers at home or prepare them for competition. Kegging is a great step for an intermediate homebrewer looking for more consistent and less time-consuming results.
How do you determine which is the right system for you? Read on to find out more about the pros and cons of each process to help you determine whether to bottle or keg your next batch of homebrew.
Topics We Cover
Which is better – kegging or bottling homebrew beer?
Most serious brewers will both bottle and keg at one time or another. Certain beers and situations call for one method over the other.
For homebrewers, bottling is more affordable and simpler to learn, so it’s great for beginners. It’s also the best system for those wishing to cellar their beer or to enter it into competitions.
Kegging is often thought of as more advanced yet more fun as it allows you to have beer on tap in your own home. Many people prefer the taste and effervescence of keg beer, and some say it makes homebrew taste more like commercial beer.
Total cost
One of the most important considerations when deciding whether to bottle or keg your homebrew is the overall cost.
Bottling is hands down the less expensive choice, and probably the obvious one for the weekend brewer. It is more immediately accessible and has a much lower recurring cost.
You can pick up a 24-pack of beer bottles for about $20, and you’ll probably need 2 boxes of bottles for a standard 5-gallon brew. The bottles are reusable though, so if you have bottles on hand, you’ll only need to pick up some bottle caps. You’ll also need to pick up a couple of pieces of single-purchase equipment – like this bottler and a pair of drying racks. For your first bottling, you’re looking at around $80, but this drops to the almost negligible cost of bottle caps as long as you’re only doing one brew at a time.
Kegging, on the other hand, requires a much greater up-front purchase. Even a basic 5-gallon kegging system will run you more than $200, and, for best results, you’ll still need a refrigerator to store it in. You’ll also need to consider the cost of cleaning your keg once the beer is consumed as it’s not as easy as washing it out in your sink.
Keep in mind that some of these will be recurring purchases, while some are upfront equipment costs that will amortize with each use. The best choice for your home brewing setup will depend on your budget, needs, and the amount of use you expect to get out of it.
Complexity and learning curve
The vast majority of homebrewers start out bottling.
The bottling process is fairly simple if time-consuming, and a bit tedious. Bottles must be cleaned and sanitized, then individually filled. For a standard 5-gallon recipe, you’ll be doing this about 48 times. This is not a complicated task – even once you take carbonation drops and bottle conditioning into account – and it’s fairly easy to master, especially compared to the complexities of kegging.
Kegging has a bit steeper of a learning curve, as you’ll need to learn about kegerators, CO2 tanks, and regulators.
Convenience
Though one could say it’s equally easy to pour beer from a bottle as it is to pour from a keg, you can’t deny the hours of time-savings kegging allows you to gain during the filling process.
It’s also much easier to do solo, or with minimal help.
Portability
Depending on where you’re taking your beer, the question of portability could land on the side of either bottles or kegs.
Bottles are easy to grab and go, but they’re admittedly heavy, not to mention, fragile. Kegs are larger, but there is no need to carry multiple items. If you’re planning on transporting an entire batch of beer, bottles and kegs are fairly evenly matched.
Keggers that wish to transport their beer in bottles, growlers, or virtually any other vessel can use a counter pressure filler.
Entering beer competitions
Homebrew competitions almost always require competitors to submit their beer in bottles.
If you plan to compete with your homebrew, you’ll have to bottle at least some of it.
Drinkability
This is up for debate among many homebrewers, but the consistent carbonation and lack of light exposure from a keg mean that keg beer really does taste better most of the time.
Kegs, however, do typically need to be stored in a refrigerator; if they are left in a temperature-unstable environment, the flavor will be affected.
Carbonation
Kegs win the carbonation debate every time, based on the speed and consistency with which they carbonate beer.
Whereas bottle-conditioning can take two weeks or more, forcing CO2 into your beer in a keg will make it drinkable in a matter of a day or two. Because of the regulator, they allow you to dial in your carbonation level very precisely and maintain it over time.
Long-term storage or aging
Bottles win when it comes to long-term storage.
As long as they’re stored in a cool, dark place, they can last for years. They also take up a heck of a lot less space than kegs, making them the best bet for cellaring homebrew.
Bottling homebrew beer – when does it make sense?
Once you’ve brewed your first beer, you need somewhere to store it. Chances are this will be a 12oz bottle as most beer drinkers have those on hand and many starter kits are shipped with enough for the brew in question.
The easiest vessels for beginning homebrewers to use are glass bottles.
Just about anyone can learn to bottle beer, but there are pros and cons to this method.
Initial cost and equipment needed
The initial cost for bottling alone is relatively low, and most beginner homebrew kits come with all the supplies you need for bottling except the bottles.
- Bottles – Though you can purchase new bottles outright, many homebrewers simply clean and sanitize bottles from commercial beer they purchased. Just be sure to only use bottles that have regular pry-off caps. Twist-off bottles have threads and won’t create a seal with most cappers.
- Caps – Bottle caps cannot be reused, but luckily picking up a few hundred bottle caps is an inexpensive investment.
Bottle Capper – A manual bottle capper is an affordable, simple tool that anyone can use to affix caps to glass bottles. - Bottle Filler – Bottle fillers are spring-loaded devices that release beer when the button on the end of them is pushed. Because of this, you can attach the filler to siphon from your beer, put the filler in the bottle, and push the filler against the bottom of each bottle to release the beer. When the bottle is full, simply lift up to stop the flow of beer.
All in, you’re looking at an initial investment of about $80 to bottle a 5-gallon batch of homebrew. If you have bottles on hand, you can probably shave off about half of that.
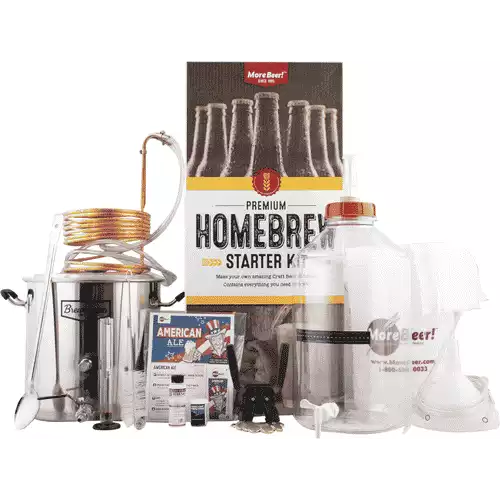
If you want a kit that includes EVERYTHING you need except for some empty bottles (I always prefer drinking beer to get those, myself) check this out!
Absolutely EVERYTHING you need to start brewing + More!
- Step-by-Step instruction pamphlet fine-tuned over 20 years for easy success
- An UPGRADED 8.5 Gallon Stainless Steel Brew Kettle w/ thermometer port, stainless ball valve, internal volume markers, Silicone handle grips
- Wide-mouth carboy plastic fermenter - EASY cleaning!
- Copper Wort Chiller for quick cooling
- Food-grade bottling bucket, mesh bags, transfer tubing
- Thermometer, hydrometer, sanitizer, cleaner, brushes, and stirring spoons
- Your choice of recipe kit - American Pale Ale, Hazy IPA, Eskimo Amber, or a Pliny the Elder Clone
- Bottle capper, caps, and all the other odds and ends you could possibly need!
Pros
There are a few key reasons why homebrewers bottle their beer:
- Cost – Bottling beer is quite affordable, and most brewers can begin bottling for under $100.
- Ease of use – The learning curve for bottling beer is low, as it uses all manual devices and no special knowledge of keg systems.
- Sharing – Beers are easier to share when they’re in the bottle. If you want to deliver homebrew for coworkers or family members to try, bottles are your best bet.
- Space – Bottles take up less space than kegerators, and can even be split among several fridges or cabinets to avoid taking over a single area with homebrew.
Cons
Despite the many benefits, there are also some drawbacks that make bottling less desirable than kegging:
- Stress – Bottling beer is a tedious process that many brewers dread. It can also be messy and difficult to do alone.
- Time – Because you aren’t forcing CO2 into your beer through a keg line, you have to wait a couple of weeks before your beer will be carbonated enough to drink after bottle-conditioning.
- Carbonation – Bottle conditioning is less consistent, meaning some beers may seem flat while others explode upon opening.
- Sediment – Some brewers find the naturally occurring sediment at the bottom of homebrew bottles undesirable (others love it).
Kegging homebrew beer – when does it make sense?
Maybe you’ve already bottled homebrew for a while and you’re ready to take the leap into kegging.
Kegging can be a great way to keep your beer fresher, longer. It’s also an impressive way to serve homebrew to guests.
There is an initial cost investment associated, but totally doable.
Initial cost and equipment needed
Despite an initial investment in new equipment that can be intimidating, you can start kegging with just a few new pieces of equipment.
Though true beginners always start a full brewing and kegging setup, you can build your own system piecemeal with just a few key pieces of equipment:
- Keg – The most popular type of keg used by homebrewers is a Cornelius or “Corny” keg. These kegs are available in two formats: a ball lock or a pin lock. Both types work great, just be sure you know which type you have.
- CO2 tank – Most cities have a local airgas company that will refill CO2 tanks. You may even be able to swap out your tank for a new one. Google “CO2 tank refill [your city]” to find the facility near you. You can also order a tank online.
- Regulator – A regulator is a gauge that allows you to measure and adjust the gas pressure coming from your CO2 tank. You can use the same regulator over and over again, and you’ll need one per keg.
- Kegerator or Refrigerator – A kegerator can be quite a hefty investment, but if you intend to keg a lot of beer, they’re necessary. If the $700 price tag is outside the price range you were looking for, a regular mini fridge can also work, just make sure its inside dimensions will fit your keg. For about a third the price of a kegerator, you can purchase a kit to turn a regular fridge into a kegerator.
- Tap – Kegerators will come with a built-in tap handle. Pump-style taps are more affordable but will decrease your keg’s shelf life immensely.
Pros
Kegging comes with a lot of benefits and is an end goal for many homebrewers for good reason.
Some key pros of kegging homebrew are:
- Time – Probably the biggest benefit of kegging is the amount of time it saves. Whereas cleaning and filling dozens of 12oz bottles one at a time can take the better part of an afternoon, a single keg can be cleaned and filled with the same batch of beer much more quickly.
- Carbonation – Kegging carbonates beer quickly and consistently.
- Environmental impact – You can reuse the same keg(s) over and over again, meaning much less environmental impact than recycling glass bottles. Even if you’re reusing bottles, the amount of water it takes to clean them dwarfs the amount you’ll use to sanitize a keg.
- Impressing your guests – It’s undeniable: as soon as your start kegging your homebrew, your friends take your beer more seriously. Having your homebrew on tap is like having a beer faucet in your house.
Cons
There are some barriers to entry to kegging.
- Cost – There’s no denying that the cost of kegging equipment can be quite significant, and is certainly greater than rinsing out a few dozen empty beer bottles. However, there are workarounds for making your own DIY kegerator.
Space – Kegerators and kegs themselves take up a decent amount of space and power, and aren’t able to be separated out the way bottles are. Be sure to have a dedicated spot to keep your kegerator where your keg won’t get jostled.


