
You may find yourself scratching your head about whether you should remove the hops from your wort before beginning primary fermentation. Homebrew recipes sometimes give conflicting instructions on this topic.
It’s best to remove the hops from your wort before proceeding with fermentation. The main reason for this is that hop trub, or residual hop debris, can cause issues like clogging equipment, clouding your beer, and even simply taking up too much space in your fermentation vessel. Some types of hops are prone to over-extract, making your beer bitter.
So what’s the best way to do this, and how does the process differ for different types of hops? Read on to find out more about this as well as more detail on why removing hops should always be on your post-boil checklist… and what to do if it’s not.
Topics We Cover
Is it necessary to strain out or remove hops before fermentation?
When hops are boiled in wort, they break down and tend to form a thick residue most homebrewers call ‘trub.” Trub consists not only of boiled hops but proteins and other particulates that clump together as a natural byproduct of the boiling process.
You should strain out your hops before fermentation because this trub:
- Can clog equipment – Trub is dense and can cause physical blockage in the hoses used for transferring your beer to its fermenter, or even later during the bottling process. Even small amounts of hop trub can build up quickly when syphoning beer, clogging equipment before you know it.
- Can cloud your beer – Some early homebrewers make the mistake of simply pouring their cooled wort directly into their primary fermenter. Doing this agitates the trub, mixing it into the wort. Trub will tend to settle over time, but further agitation during bottling, or syphoning from too low in the fermenter, will result in trub in your bottles. This should be of concern especially if you’re using a bottling bucket or other vessel with a spigot at the bottom. Though such spigots can be convenient, their placement at the bottom of the bucket can mean any settled material will get sucked up and syphoned out first.
- Takes up valuable space – Quite simply, anything you transfer to your fermenter besides beer takes up valuable space for brewing more beer! You’d be surprised how much undesirable hops and sediment can crowd your fermenter, leaving you with extra wort and nowhere to put it. Brew as much beer as possible by removing hops prior to fermentation.
None of these issues is likely to ruin a batch of beer, but they can make your job harder or cause minor undesirable qualities in your homebrew.
Do you need to remove or strain out hop pellets before fermentation?
You should always remove hop pellets before fermentation if you can. Using a hop bag or spider will help this process considerably.
They, of course, won’t be pellets anymore. Rather, they will have broken down into fine particulates.
The particulates resulting from hop pellets are particularly prone to contributing to trub.
Do you need to remove or strain out whole hops before fermentation?
Like hop pellets, even whole hops should be removed prior to fermentation.
Whole hops can be used either dried or fresh, and either way should be removed prior to fermentation. They should be easy to spot as they don’t break down as much as pellet hops.
Using a hop bag or hop spider during the boil
The two most common and easy-to-use tools for removing hops prior to fermentation are hop bags and hop spiders.
Both are affordable solutions to the task of removing hops during or immediately after your boil.
What is a hop bag?
A hop bag is just that: a mesh bag you can use to contain your hops, and even other ingredients like malts or flavoring agents, during the boil. Think of it as a big tea bag for your beer.
Simply add your hops to the bag, tie it off or close it thoroughly, and when it’s time to add your hops, add the whole bag. Your hops will steep the same way tea does in a teabag, and just like a teabag, removal is as simple as pulling out the bag.
A common and very affordable type of hop bag is made of muslin, like this one. This style is easy to use and a pack of 100 bags is only about $30. The bags are tall enough that you can even tie them to the handles of your brew kettle to avoid having to fish out the whole wet bag.
The downside of using hop bags is they aren’t reusable, so you’ll need to use a fresh bag with every boil. Though this isn’t terribly inconvenient, it does add a bit of extra waste to the brewing process.
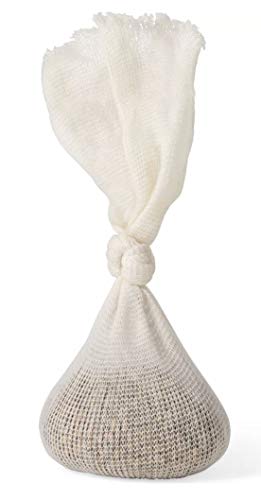
- THE STRENGTH OF MUSLIN: Common materials include mesh, nylon, or muslin fabric. Muslin bags are the best of the three due to the durability, permeability, and stretchy disposition of the material.
- A NO-FUSS EXTRACTION METHOD: Whether you are using hop pellets, whole hops, or whole grains, it’s more convenient to use a filtering system than submerging them directly into the brew.
Prices pulled from the Amazon Product Advertising API on:
Product prices and availability are accurate as of the date/time indicated and are subject to change. Any price and availability information displayed on [relevant Amazon Site(s), as applicable] at the time of purchase will apply to the purchase of this product.
What is a hop spider?
Hop spiders are a great reusable alternative to hop bags.
A hop spider is essentially an open-topped cylindrical metal strainer, typically with hooks on top to make it easy to attach the spider to the edge of your brew kettle.
Hop spiders are typically about as tall as a brew kettle, and their open top means you can freely add different amounts and types of hops and different points during the boil. This is a huge benefit as most advanced brewers would agree it’s best to be able to maintain this level of control over hopping your beer.
The only downside of using a hop spider is it is one additional piece of equipment to clean during and after the brewing process. They also tend towards being overkill depending on the batch size of your homebrew.
If you want to check one out, this one has a 300-micron mesh and should last you basically forever.
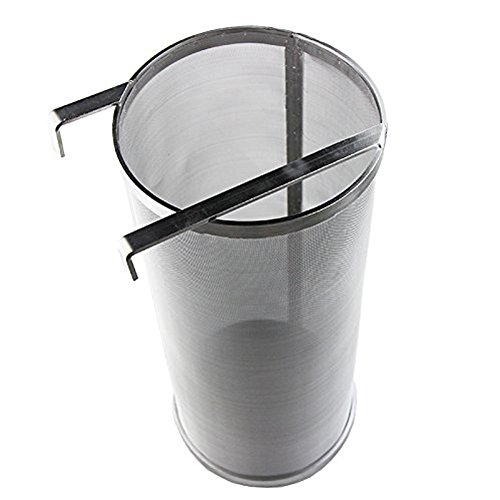
- GOOD FILTRATION - This brew filter will dramatically keep hop trub from getting in your brew bucket
- COVENIENCE - Works better than beer cloth bags, feel free to add any hops any time, easy to clean with a sprayer
- PREMIUM QUALITY - Made of stainless steel, rust-proof and hot-resistant , has a long service l
Prices pulled from the Amazon Product Advertising API on:
Product prices and availability are accurate as of the date/time indicated and are subject to change. Any price and availability information displayed on [relevant Amazon Site(s), as applicable] at the time of purchase will apply to the purchase of this product.
How to remove or strain out hops before starting homebrew fermentation
If you don’t have a hop bag or hop spider on hand, you do have options for removing hops that are free-floating in your wort.
Use the whirlpool method
Commercial breweries often have a whirlpool tank that creates a whirlpool in the wort, naturally causing hop trub and other particulates to centralize at the bottom of the whirlpool.
Homebrewers can recreate this manually using a spoon or paddle by thoroughly stirring the chilled wort until a whirlpool forms. Siphoning from the edges of the kettle should theoretically make it easier to grab wort without the trub.
As you may have guessed, this is not a perfect process. Because it’s quite manual, it also isn’t as easier to execute as some other techniques.
Strain out hops using cheeesecloth or a funnel with strainer
If you have a fine enough strainer, you can simply strain out trub the way you would strain pasta out of pasta water.
Typical kitchen strainers are not fine enough and will allow trub particulates to pass through. Because of this, it’s best to use a cheesecloth or a funnel with a built-in strainer.
It’s typically best to strain out hops prior to letting wort cool, however, it can be quite dangerous to handle and pour large amounts of boiling water. Be careful to avoid splashing and never handle a hot brew kettle without gloves to protect your hands.
What happens if you don’t remove hops before fermentation?
If you’re waiting on your hop spider to arrive, or already have begun to ferment your homebrew without removing the hops, the good news is that remaining hops will almost never ruin a batch of beer.
Even though their presence may not be optimal, or make bottling more challenging, your beer should still be perfectly drinkable if you leave them in while your beer ferments.